
Want to create your own strong, self-healing network with low-cost Raspberry Pi devices? This guide explores Raspberry Pi mesh networks. You’ll learn how these networks work without a central controller and why Raspberry Pis are great for this. We’ll also show you how to set up your own network using a system called B.A.T.M.A.N.-adv. Get ready to discover decentralized connections for communication, sharing data, and cool Internet of Things (IoT) projects.
Understanding Raspberry Pi Mesh Networks in Depth #
A Raspberry Pi mesh network uses Raspberry Pi devices as nodes, or connection points. These nodes talk directly to each other. This creates a network that doesn’t depend on one main router. If one Pi node stops working, the network can find a new path for the data. This makes the network very reliable. It’s great for places where normal internet is bad, not available, or too expensive. These systems offer powerful ways to communicate.
What Exactly is a Mesh Network? #
So, what makes a network a ‘mesh’? It’s different from old-style networks. First, there’s no single point that can shut everything down. If one Pi node fails, the network usually keeps working because data finds another route. This strength is a big plus for mesh networks.
Second, mesh networks use smart, dynamic routing. The Pi nodes constantly check for the best ways to send information. They use rules to pick paths based on things like connection quality or how busy the network is. This keeps data flowing well.
Third, they use multi-hop communication. This means data can travel over long distances by jumping from one Pi node to the next. Each Pi acts like a sender, receiver, and a helper that passes messages along. This extends the network’s reach and can spread the workload.
Mobile Ad-hoc Networks (MANETs) are a good example of mesh ideas. MANETs are wireless networks where nodes can move around and organize themselves without fixed equipment. The flexible nature of mesh is perfect for these.
Why Raspberry Pi is Perfect for DIY Mesh Networks #
Raspberry Pi computers are a top choice for building your own mesh networks for many good reasons:
- Low Cost: Raspberry Pis are cheap. This means you can buy several to build a mesh network without spending a lot of money. Models like the Pi Zero W make it even more affordable.
- Low Power Use: They don’t use much electricity. This is great for setups that run on batteries or are off the main power grid.
- Small Size: They are tiny, so you can put them almost anywhere.
- Linux-Friendly: Raspberry Pi OS and other Linux systems fully support mesh tools like B.A.T.M.A.N.-adv.
- Good for Networking: They have Wi-Fi and Ethernet ports. You can also add more network connections using USB if needed.
- GPIO Pins: These pins let you connect sensors and other devices. This makes Raspberry Pis great for IoT projects within your mesh.
- Big Community: Lots of people use Raspberry Pi. This means many online guides, forums, and shared tips to help you build and fix your mesh network.
Different Raspberry Pi models suit different mesh network needs:
- Raspberry Pi Zero W/WH: Very cheap and small. Good for many simple nodes where power use is key. Might be slow for heavy traffic.
- Raspberry Pi 3 (Model A+/B/B+): A good mix of price and power. Strong enough for most mesh node tasks.
- Raspberry Pi 4 Model B: Much faster, with more memory and better Wi-Fi. Good for busy nodes or as a gateway to the internet. Uses more power and might need a small fan.
- Raspberry Pi 5: The most powerful Pi. Best for networks with lots of data or nodes doing complex tasks. Costs more and needs a fan.
Think about the Wi-Fi chip too. Some support special mesh features (like 802.11s). Using more than one Wi-Fi radio can also improve your network.
Here’s a quick comparison:
| Feature | Raspberry Pi Zero W/WH | Raspberry Pi 3 (B/B+) | Raspberry Pi 4 Model B | Raspberry Pi 5 |
|---|---|---|---|---|
| Pros | V. low cost, small | Good perf./cost | High perf., GbE, USB 3.0 | Highest perf., PCIe |
| Built-in Wi-Fi, v. low power | Built-in Wi-Fi | More RAM, Dual-band Wi-Fi | Faster Wi-Fi (on some) | |
| Cons | Limited CPU/RAM | Higher power than Zero | Higher cost & power | Highest cost & power |
| Fewer I/O | 2.4GHz Wi-Fi (some) | May need cooling | Needs active cooling | |
| Best For | Lightweight nodes | General purpose nodes | Demanding nodes, gateways | High-throughput, complex apps |
This flexibility makes Raspberry Pi a great choice for exploring mesh networks, from simple home setups to complex mobile networks.
B.A.T.M.A.N.-adv: The Heart of Your Pi Mesh Network #
When building a strong and flexible network with your Raspberry Pi devices, especially a B.A.T.M.A.N. mesh, the routing protocol you pick is very important. B.A.T.M.A.N.-adv is a popular and effective choice. It stands for Better Approach To Mobile Ad-hoc Networking advanced. This Layer 2 routing protocol is made for ad-hoc mesh networks. Many Raspberry Pi users like it because it works well and is reliable. It runs as part of the Linux system, which helps it perform fast.
How Does B.A.T.M.A.N.-adv Work? #
B.A.T.M.A.N.-adv acts like a big, shared virtual network switch. It works at Layer 2, dealing with data frames directly, not IP addresses. This means all Raspberry Pi nodes in the B.A.T.M.A.N.-adv mesh look like they’re on the same local network. B.A.T.M.A.N.-adv creates a virtual network connection, usually called bat0. Data sent to bat0 is smartly routed across the mesh.
How does it find other nodes and pick the best paths? It uses Originator Messages (OGMs). Each Pi node in the mesh sends out OGMs. These messages say, “I’m here, and here’s how good my connection is to my neighbors!” When other nodes get this message, they pass it on. Before passing it, they update the message with their own connection quality. This way, OGMs spread through the network, carrying info about who is there and the best paths to reach them. Each node keeps a map of the best paths. If a better path appears, the node updates its map and uses the new route. This helps the network automatically find nodes and adjust if things change.
Key Features of B.A.T.M.A.N.-adv #
B.A.T.M.A.N.-adv has many good features for Raspberry Pi mesh networks:
- Scalable: It can support many nodes, so you can grow your B.A.T.M.A.N. mesh.
- Strong and Adaptable: The network can fix itself. It quickly adjusts to node failures or changes.
- Fairly Simple Setup: Setting up a basic B.A.T.M.A.N.-adv network is not too hard.
- Works with Different Links: It works over Wi-Fi, Ethernet, and can even combine multiple connections.
- Runs in Kernel: This means it’s fast and doesn’t slow down your Raspberry Pi much.
- No Central Controller: The network is very resilient because it doesn’t rely on one main node.
- Advanced Features: It has smart tools like Distributed ARP Table (DAT) for faster connections, good ways to handle group traffic, and Bridge Loop Avoidance II (BLA II) to keep complex networks stable.
- Keeps Getting Better: Developers are always improving B.A.T.M.A.N.-adv. Recent versions (like
2024.0) work with newer Linux systems and fix bugs. They build on older updates that added features like BLA II, support for network namespaces, interface bonding, multipath routing, and network coding. Future updates aim for even more improvements, like support for larger data packets.
These features make B.A.T.M.A.N.-adv a solid choice for your Pi mesh network.
Step-by-Step: Building Your Raspberry Pi Mesh Network #
Setting up a Raspberry Pi mesh network can be a fun project. This B.A.T.M.A.N.-adv tutorial will guide you through the main steps to get your first Pi nodes talking to each other.
Hardware You’ll Need #
Before you start, gather your parts for your Raspberry Pi nodes:
- Raspberry Pi Devices: Newer models like Pi 3B+, Pi 4, or Pi 5 work well. A Pi Zero 2 W can also be used for nodes that need less power.
- Wi-Fi Adapters:
- Built-in: The Wi-Fi on Pi 3B+, 4, and 5 usually supports ad-hoc mode, which B.A.T.M.A.N.-adv needs.
- USB Dongles: If your Pi doesn’t have Wi-Fi, or you need another connection, use a USB Wi-Fi dongle. Make sure it supports ad-hoc mode. Check this carefully.
- SD Cards: One good microSD card (8GB or bigger) for each Raspberry Pi. Flash it with Raspberry Pi OS.
- Power Supplies: The right power supply for each Raspberry Pi model.
Software Setup #
Now, let’s get the software ready on each Raspberry Pi node.
- Flash Raspberry Pi OS: Use Raspberry Pi OS Lite if you don’t need a desktop. This saves resources. Use the Raspberry Pi Imager tool.
- Update System: Start your Pi, connect to the internet (using Ethernet or normal Wi-Fi for now), and update:
sudo apt update sudo apt upgrade -y - Install batctl: This tool helps you manage B.A.T.M.A.N.-adv.
sudo apt install batctl -y - Load B.A.T.M.A.N.-adv Module: This part of the system software is usually included. Make sure it’s loaded:
To load it every time you boot, add
sudo modprobe batman-advbatman-advto the file/etc/modules.
Basic Node Setup #
Do these steps on each Raspberry Pi in your mesh. Use a different IP address for each node’s bat0 connection.
-
Find your Wi-Fi connection name, usually
wlan0. -
Turn off the Wi-Fi to change settings:
sudo ip link set dev wlan0 down -
Set
wlan0to ad-hoc mode. All nodes must use the same channel and ESSID (mesh name). Theapaddress (BSSID) should also be the same.sudo iwconfig wlan0 mode ad-hoc sudo iwconfig wlan0 channel 6 sudo iwconfig wlan0 essid my-r-mesh sudo iwconfig wlan0 ap 02:CA:FF:EE:BA:BEChange
6to your channel andmy-r-meshto your mesh name. Use the sameapMAC address for all nodes in this ad-hoc network. -
Set the MTU (Maximum Transmission Unit) for
wlan0. B.A.T.M.A.N.-adv needs a bit more space for its data. 1532 is common.sudo ip link set mtu 1532 dev wlan0 -
Turn the Wi-Fi back on:
sudo ip link set dev wlan0 upWait a second for it to start:
sleep 1s. -
Create the
bat0virtual connection. Your system will use this to talk over the mesh:sudo ip link add name bat0 type batadv -
Add your Wi-Fi (
wlan0) to B.A.T.M.A.N.-adv, linking it tobat0:sudo batctl if add wlan0 -
Turn on the
bat0connection:sudo ip link set up dev bat0Waiting a second (
sleep 1s) can help. -
Give a unique IP address to
bat0on each node. These IPs will be in the same group (subnet). For example:- Node 1:
sudo ifconfig bat0 172.27.0.1/16 - Node 2:
sudo ifconfig bat0 172.27.0.2/16 - And so on.
If you see “Error - Interface bat0 is not present…”, it often means a step was missed. Check that the
batman-advmodule loaded,wlan0is in ad-hoc mode,bat0was created,wlan0was added to B.A.T.M.A.N.-adv, andbat0is up. - Node 1:
Checking Your Mesh #
Once you have at least two nodes set up, check if your Raspberry Pi mesh network is working.
- List Nodes: On any node, see all B.A.T.M.A.N.-adv nodes it can find.
You should see the MAC addresses of your other active mesh nodes.
sudo batctl o - Check Neighbors: See direct neighbors.
sudo batctl n - Ping via B.A.T.M.A.N.-adv: Ping another node using its
wlan0MAC address.Example:sudo batctl p <MAC_address_of_another_node_wlan0>sudo batctl p 00:11:22:33:44:55 - Test IP Connection: Ping the
bat0IP address of another node.(If you are on node 172.27.0.1 trying to reach 172.27.0.2).ping 172.27.0.2
If these work, you’ve built a basic B.A.T.M.A.N.-adv mesh network! This is a great start for more advanced Raspberry Pi projects.
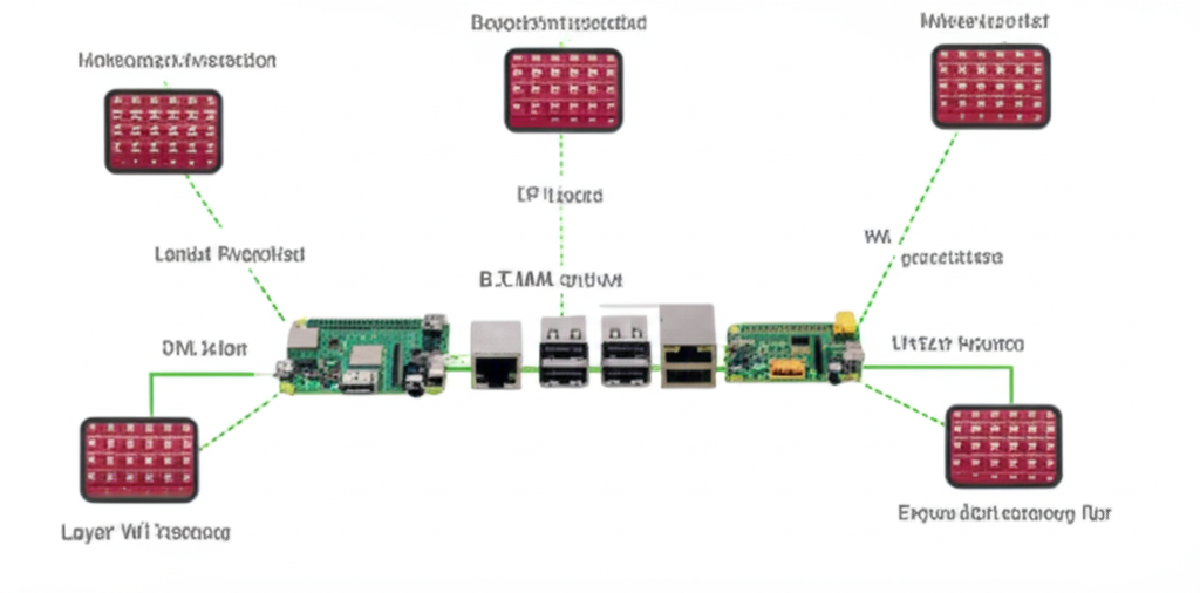
Expanding Your Mesh: Internet Gateway & Wi-Fi Access Point #
Let’s make your Raspberry Pi mesh network even more useful! After your nodes can talk to each other, you might want to connect your whole mesh to the internet. You might also want to let regular Wi-Fi devices join your mesh. This means setting up one Pi as an internet gateway and another (or the same one) as a Wi-Fi access point (AP).
Setting Up an Internet Gateway Node #
To share an internet connection with your mesh, one Raspberry Pi node acts as a gateway. This gateway Pi sends traffic between your mesh network (on bat0) and your internet connection (like eth0 for wired, or wlan0 if using Wi-Fi for internet).
First, allow IP forwarding on the gateway Pi. This lets it pass data between different network connections.
sudo sysctl -w net.ipv4.ip_forward=1
To make this permanent, change the line net.ipv4.ip_forward=1 in /etc/sysctl.conf (remove the # if it’s there, or add the line) and run sudo sysctl -p.
Next, set up Network Address Translation (NAT) with iptables. NAT lets many devices on your mesh share one public IP address. These rules are important for an iptables NAT mesh setup. They route traffic from bat0 to eth0 (change eth0 if your internet is on a different connection):
sudo iptables -t nat -A POSTROUTING -o eth0 -j MASQUERADE
sudo iptables -A FORWARD -i eth0 -o bat0 -m state --state RELATED,ESTABLISHED -j ACCEPT
sudo iptables -A FORWARD -i bat0 -o eth0 -j ACCEPT
The MASQUERADE rule does the IP address sharing. The FORWARD rules let traffic flow. Save these iptables rules so they load when you restart. You can use iptables-persistent:
sudo apt-get install iptables-persistent
sudo netfilter-persistent save
For other mesh nodes to use this gateway, the gateway Pi must announce itself. On the gateway node:
sudo batctl gw_mode server 50mbit/10mbit # Example speed, change as needed
This tells the B.A.T.M.A.N.-adv gateway to advertise its internet. Other nodes in the mesh (client nodes) need to look for this gateway:
sudo batctl gw_mode client
B.A.T.M.A.N.-adv picks the best gateway automatically. If one gateway stops working, clients can switch to another.
Here’s a quick guide for batctl gw_mode commands:
| Command | Purpose | Node Type |
|---|---|---|
sudo batctl gw_mode off |
Turns off any gateway mode. | Any |
sudo batctl gw_mode server [down/up] |
Announces this node as an internet gateway. You can state bandwidth (e.g., 50mbit/10mbit). |
Gateway |
sudo batctl gw_mode client [sel_class] |
Allows picking a B.A.T.M.A.N.-adv gateway. You can state a speed threshold. | Mesh Client |
sudo batctl gw_mode |
Shows the node’s current gateway mode. | Any |
sudo batctl gwl |
Lists known gateways in the mesh. | Any |
If you get “network unreachable” errors, check these common problems:
- IP forwarding is not on.
iptablesrules are wrong or not saved.- The gateway node needs an IP address on its
bat0connection (e.g.,192.168.199.1/24). - Client mesh nodes don’t have IP addresses in the same group or can’t find the gateway. A DHCP server (like
dnsmasq) on the gateway, giving IPs onbat0, often fixes this. - DNS problems: Mesh clients need DNS server addresses (usually from the gateway via DHCP).
- Forgetting to set
batctl gw_mode serveron the gateway orbatctl gw_mode clienton other nodes.
The binnes/WiFiMeshRaspberryPi GitHub page has a good guide for setting up a B.A.T.M.A.N.-adv gateway.
Setting Up a Mesh Node as a Wi-Fi Access Point #
To let non-mesh devices (like laptops and phones) connect to your mesh and use its internet, you can set up a Raspberry Pi node as a Wi-Fi Access Point (AP). This creates a Raspberry Pi Wi-Fi access point mesh bridge.
Use hostapd (to make the AP) and dnsmasq (to give IP addresses and DNS to AP clients).
It’s best to use a separate Wi-Fi connection for the AP. For example, if wlan0 is for the mesh, a USB Wi-Fi dongle could be wlan1 for the AP. Using one Wi-Fi for both mesh and AP is possible but harder.
The main step is to bridge the AP’s Wi-Fi with your mesh’s bat0 connection. This lets traffic from Wi-Fi clients get onto the mesh.
- Install tools:
sudo apt-get update sudo apt-get install hostapd dnsmasq bridge-utils - Stop services before setup:
sudo systemctl stop hostapd sudo systemctl stop dnsmasq - Create a bridge, say
br-ap:sudo brctl addbr br-ap - Add your mesh (
bat0) and the AP’s Wi-Fi (e.g.,wlan1) to this bridge:sudo brctl addif br-ap bat0 sudo brctl addif br-ap wlan1 # Make sure wlan1 isn't managed by other network tools for this - Give an IP address to the bridge. This IP is the AP node’s address on the mesh.
bat0andwlan1should not have their own IPs here.Make these settings permanent, usually insudo ifconfig wlan1 0.0.0.0 sudo ifconfig bat0 0.0.0.0 # If it had an IP, it now moves to br-ap sudo ifconfig br-ap 192.168.199.X/24 up # Change X to a unique IP in your mesh group/etc/network/interfacesor withsystemd-networkd.
Your hostapd.conf file should use wlan1 as its connection. The dnsmasq tool should listen on br-ap and give IP addresses to Wi-Fi clients from your mesh’s IP range. This way, devices connecting to your AP join the mesh network and can reach other mesh nodes and the internet gateway.
By setting up your gateway and AP nodes carefully, you make your Raspberry Pi mesh network much more useful. Innovate. Iterate. Impact.
Raspberry Pi Mesh Network vs. Traditional Wi-Fi Extender #
When you want to improve your Wi-Fi coverage using a Raspberry Pi, you have a couple of choices. You can use it as a simple Wi-Fi extender or as a part of a more complex mesh network. Let’s see how they compare.
How a Raspberry Pi Wi-Fi Extender Works #
A Raspberry Pi can act like a Wi-Fi extender, or repeater. It takes an existing Wi-Fi signal from your main router and sends it out again. This makes your wireless network reach further. You’ll need a Raspberry Pi with Wi-Fi, or one with a USB Wi-Fi dongle. The Wi-Fi part that sends out the signal must support Access Point (AP) mode. If your Pi doesn’t have Wi-Fi, you might need two USB Wi-Fi dongles: one to get the signal and one to send it out.
Software like hostapd (for the AP) and dnsmasq (for IP addresses and DNS) are typically used. Some projects like RaspAP provide a web page to make this easier. Or you could use OpenWRT, a special Linux system for routers.
A big thing to know, especially for a simple Raspberry Pi Wi-Fi extender, is about speed. If it uses one Wi-Fi radio to both get and send the signal on the same channel, it has to switch between tasks. This usually cuts the available Wi-Fi speed in half for devices connected to the Pi. For example, if the extender gets 100 Mbps, it might only offer 50 Mbps to its clients. This speed cut can be avoided if the Pi connects to the main network with an Ethernet cable and then uses its Wi-Fi as an AP. Setting up a Raspberry Pi Wi-Fi extender is harder than a store-bought one but can save money if you already have a Pi.
Head-to-Head: Mesh Strength vs. Extender Simplicity #
Comparing a Raspberry Pi mesh network to a simple Raspberry Pi Wi-Fi extender shows key differences, especially in the mesh vs extender discussion about strength and ease of setup.
| Feature | Raspberry Pi Wi-Fi Extender | Raspberry Pi Mesh Network |
|---|---|---|
| Setup Complexity | Fairly simple for one extension point. | Harder; involves setting up multiple nodes and mesh rules (e.g., B.A.T.M.A.N. Adv, OLSR). |
| Range Extension | Point-to-point; extends range in one direction. | Covers larger, more complex areas with multiple nodes, improving overall Raspberry Pi network range. |
| Reliability | Lower. If the extender Pi fails, that part of the network is down. Adding more extenders in a chain makes this worse. | Higher. Self-healing; if one node fails, traffic can often find another way through other active Pi nodes. |
| Scalability | Poor. Speed gets much worse with each added extender in a chain. | Good. More nodes can be added to expand coverage and improve backup/speed. |
| Routing | Fixed. Devices connect to a specific extender. | Smart. Data packets can take many paths; rules choose the best route. |
| Bandwidth | Much lower per hop (about half in simple repeater mode). | Lower per hop due to wireless issues, but often better than simple repeaters over many hops. |
| Cost (Hardware) | Lower (usually one Pi per extension point). | Higher (needs multiple Raspberry Pis). |
| Fault Tolerance | Low. | High. |
A mesh network, often using rules like B.A.T.M.A.N. Advanced on each Pi device, creates a web of connected nodes. This allows for smart routing, where data can take many paths. The main benefit is fault tolerance: if one node fails, the network can often “heal” by rerouting traffic. This makes mesh networks great for covering large, tricky areas with steady connections.
On the other hand, a Raspberry Pi Wi-Fi extender is simpler for point-to-point extension. It’s usually easier to set up one Pi as an extender than a multi-node mesh. However, it’s a single point of failure for the extended network part.
When to Choose Which #
Choosing between a Raspberry Pi Wi-Fi extender and a full mesh network depends on your needs and how comfortable you are with tech.
Choose a Raspberry Pi Wi-Fi extender if:
- You need to extend Wi-Fi to a small, specific area or one room with a clear path.
- Your budget is tight, and you already have a spare Raspberry Pi. This is often enough for a simple Pi project.
- You prefer a simple setup for just one or two spots over a super reliable network.
- You are okay with some tech setup but don’t need a full mesh system.
- The main goal is basic connection, and high speed isn’t vital in the extended area.
Choose a Raspberry Pi Mesh Network if:
- You need to cover a larger home, office, or outdoor area with steady Wi-Fi, greatly boosting the Raspberry Pi network range.
- Network reliability and fault tolerance are very important (e.g., to avoid dead zones if a node fails).
- The network needs to support many hops without the big speed drops seen in chained extenders.
- You plan to add more coverage points later.
- You’re interested in a more advanced networking project and are okay with a harder setup using multiple Pi units.
- The network might have moving nodes or nodes where wiring isn’t possible. This is where the mesh vs extender choice often favors mesh for flexibility.
Performance Over Multiple Hops: Extender Chains vs. Basic Mesh #
When extending coverage over several hops, the speed differences between a chain of Pi-based Wi-Fi extenders and a basic Pi-based mesh network are clear.
A Pi-based Wi-Fi extender in a multi-hop setup (e.g., Router -> Extender1 -> Extender2 -> Client) suffers from repeated speed loss. Each wireless hop, with a single radio repeating, roughly halves the speed from the previous link. So, Extender1 might offer about 50% of the router’s speed. Extender2, through Extender1, might only give about 25%. Each hop also adds delay. Data follows a fixed path. If any extender fails or has a bad connection, all later extenders and clients are affected. It doesn’t scale well; speed quickly becomes unusable after just a couple of wireless hops. This is a major limit for extending Raspberry Pi network range over large distances with extenders.
A basic Pi-based mesh (e.g., using B.A.T.M.A.N. Adv on single-radio Pis) also sees speed drop over multiple wireless hops. This is due to sharing the wireless space and protocol needs. However, the drop is usually not a strict halving per hop like with simple repeaters. Mesh protocols check link quality and choose the “best” path. This smart routing means traffic can avoid busy or failing nodes if other paths exist. The biggest plus is reliability. If a Pi node in the mesh fails, the network can automatically reroute traffic, improving uptime. While speed per client might drop in busy areas or over many hops, the network stays functional and can cover a much larger area more reliably. Even a basic mesh with single-radio Pis is better for multi-hop situations than an extender chain because it’s more reliable and adaptable.
For multi-hop needs, the severe speed loss and lack of reliability make a Pi-based Wi-Fi extender chain a poor choice. A basic Pi-based mesh, while not super fast over many wireless-only hops, offers better reliability and flexibility. This makes it the better option when connection across multiple points is key.
Answering Your Questions: Raspberry Pi Availability, Cost, and Security #
Let’s talk about common questions regarding Raspberry Pi. My aim is to provide clear, practical advice, especially on topics often found in Raspberry Pi FAQ sections.
Is Raspberry Pi Discontinued? #
Many people ask this. The short answer is no. The Raspberry Pi platform is alive and well, with ongoing development and new products. The Raspberry Pi 5, launched in October 2023, shows this continued innovation.
Concerns about availability mostly came from global chip shortages and supply chain issues, largely due to the COVID-19 pandemic. Raspberry Pi Ltd. has said these problems eased a lot during 2023. So, if you’re wondering if Raspberry Pi is discontinued, the answer for the platform is no.
However, let’s look at specific models:
- The Raspberry Pi 5 is the newest. It’s available from approved sellers, costing around $60 for 4GB and $80 for 8GB.
- The Raspberry Pi 4 Model B is still being made and is easy to find. CEO Eben Upton said it will be produced alongside the Pi 5 for a different market, with production guaranteed until at least January 2031. This is good news for long-term projects.
- The Raspberry Pi Zero 2 W is the current Pi Zero model, priced at $15. It’s easier to find now, but it’s popular, so check official sellers or stock sites like
rpilocator.com. - The older Raspberry Pi Zero W (original price $10) is different. It’s being phased out for regular buyers because production focuses on the newer Zero 2 W. It’s not officially “End of Life” for all industrial uses, but finding new Zero W stock at $10 from official sellers is hard. For mesh projects that used the Zero W, the Zero 2 W is the new recommendation.
For the best info, check the official Raspberry Pi website and buy from their Approved Resellers.
Why is the Raspberry Pi Zero So Expensive Now? #
This is another common question, and it depends on which “Pi Zero” you mean and where you look.
Let’s clear things up:
- The current Raspberry Pi Zero 2 W has a suggested retail price (MSRP) of $15. When official sellers like Adafruit or Microcenter have it in stock, it’s usually at or near this price. So, this model isn’t “expensive” at its intended price.
- The older Raspberry Pi Zero W had an MSRP of $10. Since this model is being phased out, it’s rare. Any remaining stock, especially from third-party sellers, can be much more expensive than $10. This is likely why people think the Zero W is “expensive.”
So, why does Raspberry Pi Zero seem expensive sometimes?
- Past Shortages: During the chip crisis, all Raspberry Pi models, including Zeros, were sold at higher prices on secondary markets.
- Scalping: Unofficial sellers charged high prices due to high demand and low supply.
- Confusion: People might see high prices for the rare older Zero W and think it applies to all Zero models, including the current Zero 2 W.
- Regional Prices and Bundles: Import taxes, seller markups in some areas, or kits with extra parts can increase the final price.
Here’s a summary:
| Model | Original MSRP | Current Status | Typical Price (Official Resellers, when stocked) |
|---|---|---|---|
| Pi Zero W | $10 | Phased out, scarce | Much >$10 (if found, often 3rd party) |
| Pi Zero 2 W | $15 | Current model, production active | ~$15 |
In short, the “expensive” claim isn’t generally true for the Raspberry Pi Zero 2 W if you buy from official channels at its $15 MSRP. The idea likely comes from past supply issues or refers to the older, hard-to-find Pi Zero W. Always check stock sites like rpilocator.com for current availability and prices from official sources.
Are Raspberry Pis a Security Risk? #
This is a very important question. Any device connected to the internet, including a Raspberry Pi, can be a security risk if not managed well. The Pi itself isn’t unsafe; how you set it up and maintain it matters most.
First, basic IoT security steps apply to all Raspberry Pi setups:
- Change Default Login: This is crucial. Immediately change the default username (
pi) and password (raspberry). - Software Updates: Regularly update the operating system and all software (
sudo apt update && sudo apt full-upgrade). - Strong Passwords/Keys: Use strong, unique passwords. For remote access, using SSH keys is much safer than passwords.
- Firewall: Set up a firewall. UFW (Uncomplicated Firewall) is a good, easy option on Raspberry Pi OS to block unwanted connections.
- Reduce Attack Surface: Turn off or remove any services and software you don’t absolutely need.
- Least Privilege: Make sure services run with only the permissions they need.
- Physical Security: Protect your Pi from unauthorized physical access if it handles sensitive data or critical systems.
Now, let’s think about B.A.T.M.A.N.-adv mesh networks. Can Raspberry Pis be a security risk here? Yes, if you miss certain things. B.A.T.M.A.N.-adv works at Layer 2 (the data link layer) and handles routing. Importantly, it does not automatically encrypt the data traveling through the mesh. This means you must add encryption at higher layers or secure the wireless links themselves.
Here’s how to secure a B.A.T.M.A.N.-adv mesh:
-
Use Layers of Security:
- VPNs (Highly Recommended): Set up a Virtual Private Network like WireGuard or OpenVPN across the mesh. WireGuard is often preferred for Raspberry Pis because it’s fast. This encrypts all traffic going through the mesh VPN tunnel.
- Application-Level Encryption: Always use secure protocols like HTTPS for web traffic and SSH for secure remote control.
- Secure Wireless Links:
- Ad-hoc (IBSS) mode often only supports open (no security) or weak WEP encryption. WPA3 is usually not an option. This makes a strong VPN even more important.
- If your hardware supports 802.11s (a formal mesh standard), you can secure these links with WPA3-SAE. This provides strong encryption and checks between mesh nodes.
-
Understand L2 Mesh Network Risks:
- Eavesdropping: Possible on any unencrypted traffic.
- Jamming/Interference: Disrupting wireless signals.
- Node Impersonation: Rogue nodes trying to join. WPA3-SAE on 802.11s links helps stop this.
- Routing Attacks: Bad nodes changing routing paths or dropping data. B.A.T.M.A.N.-adv has some ways to spot problems, but attackers on an open mesh can still cause trouble.
-
Best Practices for B.A.T.M.A.N.-adv on Pis:
- Apply all general Pi security steps mentioned earlier.
- If using 802.11s, secure links between nodes with WPA3-SAE.
- Very Important: Use a VPN (like WireGuard) over the mesh for end-to-end data encryption.
- Use application-level encryption (HTTPS, TLS) for services on the mesh.
- Set up firewalls on each node to control traffic flow.
- Keep your B.A.T.M.A.N.-adv software (
batctl) and system up to date.
By taking these steps, you can greatly reduce risks and use your Raspberry Pis securely, even in complex mesh networks.
Troubleshooting Common Raspberry Pi Mesh Issues #
Working with Raspberry Pi mesh networks can be fun but tricky. You might run into some problems. Let’s look at common Raspberry Pi mesh problems and how to fix them, especially for B.A.T.M.A.N.-adv troubleshooting.
Issue: ‘bat0’ Interface Not Present or Not a Batman-adv Interface #
A common early problem is the error “Interface bat0 is not present or not a batman-adv interface.” This usually means the system can’t find or start the virtual mesh connection (bat0), which is vital for B.A.T.M.A.N.-adv. If bat0 is not present, your mesh network won’t work.
Possible reasons:
- The B.A.T.M.A.N.-adv system module (
batman_adv.ko) isn’t loaded. - The
batctltool and the B.A.T.M.A.N.-adv module versions don’t match. - Wrong commands were used to create
bat0(e.g.,ip link add name bat0 type batadv).
Solutions:
- Check Module: Use
lsmod | grep batman_adv. If nothing shows, it’s not loaded. Trysudo modprobe batman-adv. - Check System Log: Run
dmesg | grep batman-adv. This shows system messages about B.A.T.M.A.N.-adv and can reveal errors. - Check Commands: Make sure your setup commands are correct. Usually, it’s
sudo ip link add name bat0 type batadv, thensudo ip link set up dev bat0. Also, make sure the physical Wi-Fi (e.g.,wlan0) is up and in ad-hoc mode before adding it tobat0withsudo batctl if add wlan0.
Issue: Nodes Cannot See Each Other in the Mesh (batctl o)
#
Another common issue is when Raspberry Pi nodes are running B.A.T.M.A.N.-adv but can’t find each other. Running sudo batctl o (to list nodes) might only show the current node or nothing. This means there’s a problem with basic connections or B.A.T.M.A.N.-adv’s messages (OGMs) aren’t getting through. This leads to a mesh network unreachable situation between nodes.
Possible reasons:
- Wi-Fi ad-hoc mode settings are wrong (e.g., different ESSID, channel, or mode).
- Firewall rules on Pis are blocking B.A.T.M.A.N.-adv’s Layer 2 traffic.
- Physical distance or radio interference is blocking wireless signals.
- MTU (Maximum Transmission Unit) problems. B.A.T.M.A.N.-adv needs a slightly larger MTU (like 1532 or 1560) on the physical Wi-Fi connections it uses.
Solutions:
- Verify Wi-Fi Settings: On each node, use
iwconfig wlan0(or your Wi-Fi name) to check thatModeisAd-Hoc,ESSIDis the same, and they are on the sameChannel. TheAP(Access Point MAC) should also be the same if set manually. - Check MTU: Make sure the physical Wi-Fi (e.g.,
wlan0) added to B.A.T.M.A.N.-adv has an MTU of at least 1532. Set it withsudo ip link set dev wlan0 mtu 1532before adding tobat0. - Temporarily Disable Firewalls: For testing, use
sudo ufw disable(if using UFW) orsudo iptables -Fto see if a firewall is the issue. Set it up properly later. - Increase B.A.T.M.A.N.-adv Logging: Use
sudo batctl loglevel alland checkdmesg | grep batman-advfor more details. - Check Physical Setup: Ensure nodes are close enough and reduce radio interference.
Issue: Mesh Clients Cannot Access Internet via Gateway #
A tricky problem is when mesh clients can talk to each other and the gateway node, but can’t get to the internet through that gateway. Clients might get “network unreachable” errors when trying to ping an external website, even if DNS seems to work. This is a key B.A.T.M.A.N.-adv troubleshooting area for internet sharing.
Possible reasons:
- Wrong
iptablesNAT or FORWARD rules on the gateway Pi (most common cause). - IP forwarding (
net.ipv4.ip_forward) is not turned on in the gateway’s system. - Routing problems on the gateway or clients.
- DHCP server on the gateway (if used) not giving correct gateway or DNS info.
batctl gw_mode serverisn’t active on the gateway, or clients aren’t picking it.
Solutions: Gateway Troubleshooting Checklist:
- Enable IP Forwarding on Gateway:
- Check:
cat /proc/sys/net/ipv4/ip_forward(should be1). - Enable temporarily:
sudo sysctl -w net.ipv4.ip_forward=1. - Enable permanently: Edit
/etc/sysctl.confto includenet.ipv4.ip_forward=1and runsudo sysctl -p.
- Check:
- Verify
iptablesRules on Gateway:- NAT rule:
sudo iptables -t nat -S POSTROUTINGshould show a rule like-A POSTROUTING -o <internet_interface> -j MASQUERADE. - FORWARD rules:
sudo iptables -S FORWARDshould show rules allowing traffic betweenbat0and your internet connection. - Check
sudo iptables -L -nv -t natandsudo iptables -L -nvfor details.
- NAT rule:
- Configure
batctl gw_mode:- On gateway:
sudo batctl gw_mode server. - On clients:
sudo batctl gw_mode client. Checksudo batctl gwl(gateway list) on clients.
- On gateway:
- Test Routing:
- From a client, use
traceroute 8.8.8.8. See where data stops. - Check
ip route showon clients and gateway. Clients should have a default route via the gateway’sbat0IP.
- From a client, use
- DNS Configuration: Ensure clients have correct DNS server info.
- Interface IPs: All
bat0connections should be in the same IP group. The gateway’s internet connection must have a valid IP from your main network.
Useful Diagnostic Tools #
Using the right tools is key for B.A.T.M.A.N.-adv troubleshooting and fixing Raspberry Pi mesh problems.
dmesg | grep batman-adv: Shows system messages about B.A.T.M.A.N.-adv. Good for finding module load errors.batctl loglevel <options>: Changes B.A.T.M.A.N.-adv’s logging detail. Output appears indmesg. Helps debug routing and gateway issues.batctl o: Lists other B.A.T.M.A.N.-adv nodes found. Basic check for mesh connection.batctl gwl: Shows available gateways. Important for internet sharing problems.batctl tp <MAC_address>: Tests speed to another mesh node’s physical MAC address. Helps check link quality.tcpdump -i bat0 -n -e: Shows data packets on thebat0connection. Great for seeing actual traffic flow.ethtool --statistics bat0: Gives detailed stats forbat0, including B.A.T.M.A.N.-adv specific counts.iwconfig <interface>: Shows wireless settings for Wi-Fi (e.g.,wlan0). Crucial for checking ad-hoc mode, ESSID, channel, and signal.ip link show: Lists all network connections and their states. Useful to check ifbat0and Wi-Fi areUP.ip addr show: Shows IP addresses for connections. Helps verify IP setup across the mesh.
Use Cases & The Future of Intelligent Mesh Networking #
Raspberry Pi computers, combined with mesh networking, open up many practical and new uses. These networks are especially helpful where normal internet is poor or missing, creating strong, independent systems.
Practical Applications: Building a Strong Digital Network #
Raspberry Pi mesh networks are useful in many areas:
-
Community Wireless Networks: A powerful Raspberry Pi mesh use case is helping local communities. Using tools like B.A.T.M.A.N.-adv, these networks can offer internet access, especially in places with bad connections. Nodes can even be solar-powered for off-grid use.
-
Emergency & Disaster Help: When normal communication is down, a quick-to-set-up Raspberry Pi mesh can provide a temporary network. This helps first responders and affected people share messages, make calls, or send data. Using LoRa (Long Range) tech with Raspberry Pi can extend this, offering low-power, long-distance communication for wider coverage in emergencies.
-
Environmental Monitoring & IoT: Raspberry Pis are cheap and flexible, making them great for large IoT mesh network setups. As nodes, they can gather data from sensors (temperature, air quality, etc.). This data is sent through the mesh. Such systems are useful in big farms, forests, or cities.
-
Remote Farming: On large farms with poor Wi-Fi or cell signals, Raspberry Pi mesh networks can check soil, weather, and control watering systems.
-
Learning Tool: Setting up a Raspberry Pi mesh is a great hands-on learning project. It teaches about networks, Linux, and decentralized systems. Many online guides and GitHub projects make this easy for students and hobbyists.
-
New Decentralized Services: People are experimenting with Raspberry Pi meshes for new uses, like hosting decentralized apps (DApps), creating shared file storage, or local communication platforms that don’t need central servers.
-
Strong Mobile Ad-Hoc Networks (MANETs): B.A.T.M.A.N.-adv is good for MANETs, where nodes move and the network changes. Uses include controlling robots, car-to-car communication, or temporary networks for events.
The Next Step: Intelligent and Secure Mesh #
The future of mesh networking looks good, focusing on smarts and better security:
-
AI-Powered Smart Routing: Current mesh routing, like B.A.T.M.A.N.-adv, uses things like link quality. Adding Artificial Intelligence (AI) and Machine Learning (ML) can make this much smarter. AI could help networks learn, predict problems like link failures or busy spots, and reroute traffic more intelligently. This could involve predicting link quality, adjusting bandwidth based on real-time needs, and picking nodes based on energy levels or workload. This will truly improve the future of mesh networking.
-
Making the Mesh Stronger: Advanced Security: Security is very important for open wireless mesh networks. Current methods use WPA2/WPA3 for link security and VPNs for overall encryption. Research is looking for even stronger solutions. This includes WPA2-Enterprise with better authentication and encryption. For IoT mesh networks with devices like Raspberry Pi, light and fast security methods are being explored. Future improvements will likely include smarter systems to detect intrusions and make these networks even safer.
Open Collaboration: Improving Mesh Together #
A strong open-source community and ongoing research are key to making Raspberry Pi mesh better.
-
B.A.T.M.A.N.-adv: This is the main open-source Layer 2 routing system, found at
open-mesh.org. It has many features and tools likebatctl(for setup),alfred(for sharing local network info), andbatadv-vis(for seeing the network). -
Community Projects and Research: Many GitHub projects show how B.A.T.M.A.N.-adv is used and improved on Raspberry Pi. Examples like the old
binnes/WiFiMeshRaspberryPiguide andamroczeK/tribes-mesh-networkshow community work. Thegithub.com/topics/batman-advpage is a good place to find current projects. Researchers are comparing B.A.T.M.A.N.-adv to other systems, creating better security, and looking at using AI/ML for smarter routing on Raspberry Pi meshes. There’s also much interest in using it for internet in rural areas and large IoT setups.
These shared efforts keep pushing what’s possible with smart mesh networking.
Decoding the future of intelligence, ethically.
Conclusion: Innovate, Iterate, Impact with Your Pi Mesh Network #
We’ve explored how to create your own strong communication lines with Raspberry Pi. As we finish this Raspberry Pi mesh conclusion, it’s clear that building robust, independent networks is easier than ever. My personal motto is: Innovate. Iterate. Impact. Let’s see how this applies.
Your Pi Mesh Journey: From Idea to Connection #
Building a DIY mesh network with Raspberry Pis is quite easy to start. These cheap, small devices use little power and have built-in Wi-Fi, making them perfect for trying things out. Newer models like the Raspberry Pi 4 are powerful enough for mesh routing and handling lots of network traffic. The large, helpful Raspberry Pi community also provides many tutorials, shared projects, and troubleshooting tips.
The main benefits of these setups are the same as mesh networking strengths: better coverage without dead zones, great reliability because data can reroute if a node fails, easy growth by adding more Pi nodes, and smooth connections for devices moving around the network. These are real, practical benefits.
Building Strong, Independent Connections #
The real power of a Raspberry Pi mesh network is that it’s decentralized. With no single central point of failure, these networks are very strong. This is different from old network types. This design makes them great for off-grid communication systems. This is vital for remote areas, during emergencies when normal systems might fail, or for temporary setups where internet is bad or missing.
Also, systems like B.A.T.M.A.N.-adv, working at Layer 2, make things simpler. They make all nodes look like they’re on the same local network. This makes setup, IP addresses, and finding services easier across your DIY mesh network.
The Spirit of Open Source: Try and Share #
This leads us to open source networking. B.A.T.M.A.N.-adv (Better Approach To Mobile Ad-hoc Networking) is a great example. It’s a powerful, free-to-use routing system developed by a global community, including groups like Freifunk. Its open nature, and that of software like OpenWrt (which can run on Raspberry Pis), invites you to join in.
I encourage you to not just use this tech, but to learn more. Look at the code, suggest changes, report problems, help with guides, or even create new features. This is where iteration helps. The official Open-Mesh.org website is a good place to start learning about B.A.T.M.A.N.-adv. Your help, no matter how small, makes the whole system better for everyone.
Real-World Impact: Your Mesh, Your Solution #
You can use this knowledge in many impactful ways. Think of ad-hoc communication networks in disaster areas, providing vital voice and text services when nothing else works. Think of community networks, giving local internet access to areas that need it, like Freifunk does.
These Raspberry Pi meshes can also support large Internet of Things setups – for smart farming, environmental monitoring, or smart city projects, especially with long-range, low-power tech like LoRa. They are also amazing learning tools for networking, Linux, and distributed systems. From secure, private communication for small groups to extending Wi-Fi over large areas, there are many uses.
The mix of cheap, programmable hardware like Raspberry Pi with flexible open source networking software is great for innovation. This is your chance to create solutions for unique problems, try different systems, and add various sensors and services.
Innovate. Iterate. Impact. #
So, I encourage you to take these ideas and tools and start your own project. Innovate by thinking of new uses. Iterate by building, testing, learning, and sharing back with the open source community. And most importantly, aim to make an Impact by using this knowledge to solve real-world problems, big or small. The next breakthrough is just a line of code away. By shaping the future with intelligent systems, we empower everyone.
Call to Action: Share Your Thoughts! #
What exciting projects are you planning with your Raspberry Pi mesh network? The maker spirit is strong, and these small boards are powering some truly new communication systems. Whether you’re an expert network builder or just starting with ad-hoc networks, your ideas are valuable.
Do you have experiences, tips, or questions to share? Maybe you’ve set up B.A.T.M.A.N.-adv, adjusted batctl settings, or are trying LoRa modules for long range in your mesh network projects? The Raspberry Pi community grows through collaboration, and we want to learn from you.
Share Your Setups and Discoveries #
We’d love to hear about:
- Which Raspberry Pi models (Zero W, 3B+, RPi 4) you’re using for nodes and why.
- Unique uses you’re creating or thinking about – from off-grid communication, to extending Wi-Fi, or building strong IoT networks.
- Software choices and custom scripts: Are you using Python, or tools like Ansible playbooks (e.g., Meshberry) to automate setup?
- Security steps you’re taking for private data on your mesh.
Troubleshooting Wins and Lingering Questions #
Did you solve a hard setup problem? Or are you stuck on an issue now? Sharing these helps everyone in the Raspberry Pi community. Your questions can start discussions that lead to new solutions. Don’t be afraid to share your ideas, even if they’re new. Our shared research and experiments drive progress.
Join the conversation in the comments below – let’s shape the future with intelligent systems together! Your work on these mesh network projects helps build a more connected and empowered world, one node at a time.